Cheater’s Patatas Bravas

Cheater’s Patatas Bravas

I planted my little raised bed garden this week with cool weather vegetables, mostly greens and herbs. These will grow nicely with the cooler temps of a desert southwest autumn. But on the farm, the garden would be winding up now for the season. Daddy would dig up the rows and rows of root vegetables that would overwinter in the “basement,” really more of a root cellar. Plentiful amounts of onions, a few carrots and a boatload of potatoes were hauled down and stored with straw in baskets. Those potatoes would be baked, roasted, braised, mashed and escalloped throughout the fall and winter. 

I don’t eat as many potatoes as we did on the farm, not because I doubt their health benefits; there are just too many other root vegetable and grain options.  Potatoes have reasonable calories and are high in vitamin C, vitamin B6, potassium and manganese. However, they get into serious trouble when they are peeled and hang out with fatty friends, like deep hot oil and copious amounts of butter. Which is why I eat true patatas bravas only when I am at a fine tapas restaurant. (I’m looking at you, Bolero.

Patatas Bravas is a tapas potato dish redolent of Spain, fried in olive oil and drizzled with Bravas sauce. The sauce includes yes, more olive oil along with tomato, smoked paprika, crushed pepper and sherry vinegar. The rich smoky sauce is accented by the slight acidity of the sherry vinegar, and it is to die for. But I don’t need that much rich fatty trouble with my potatoes on a regular basis at home… hence, my cheat. 

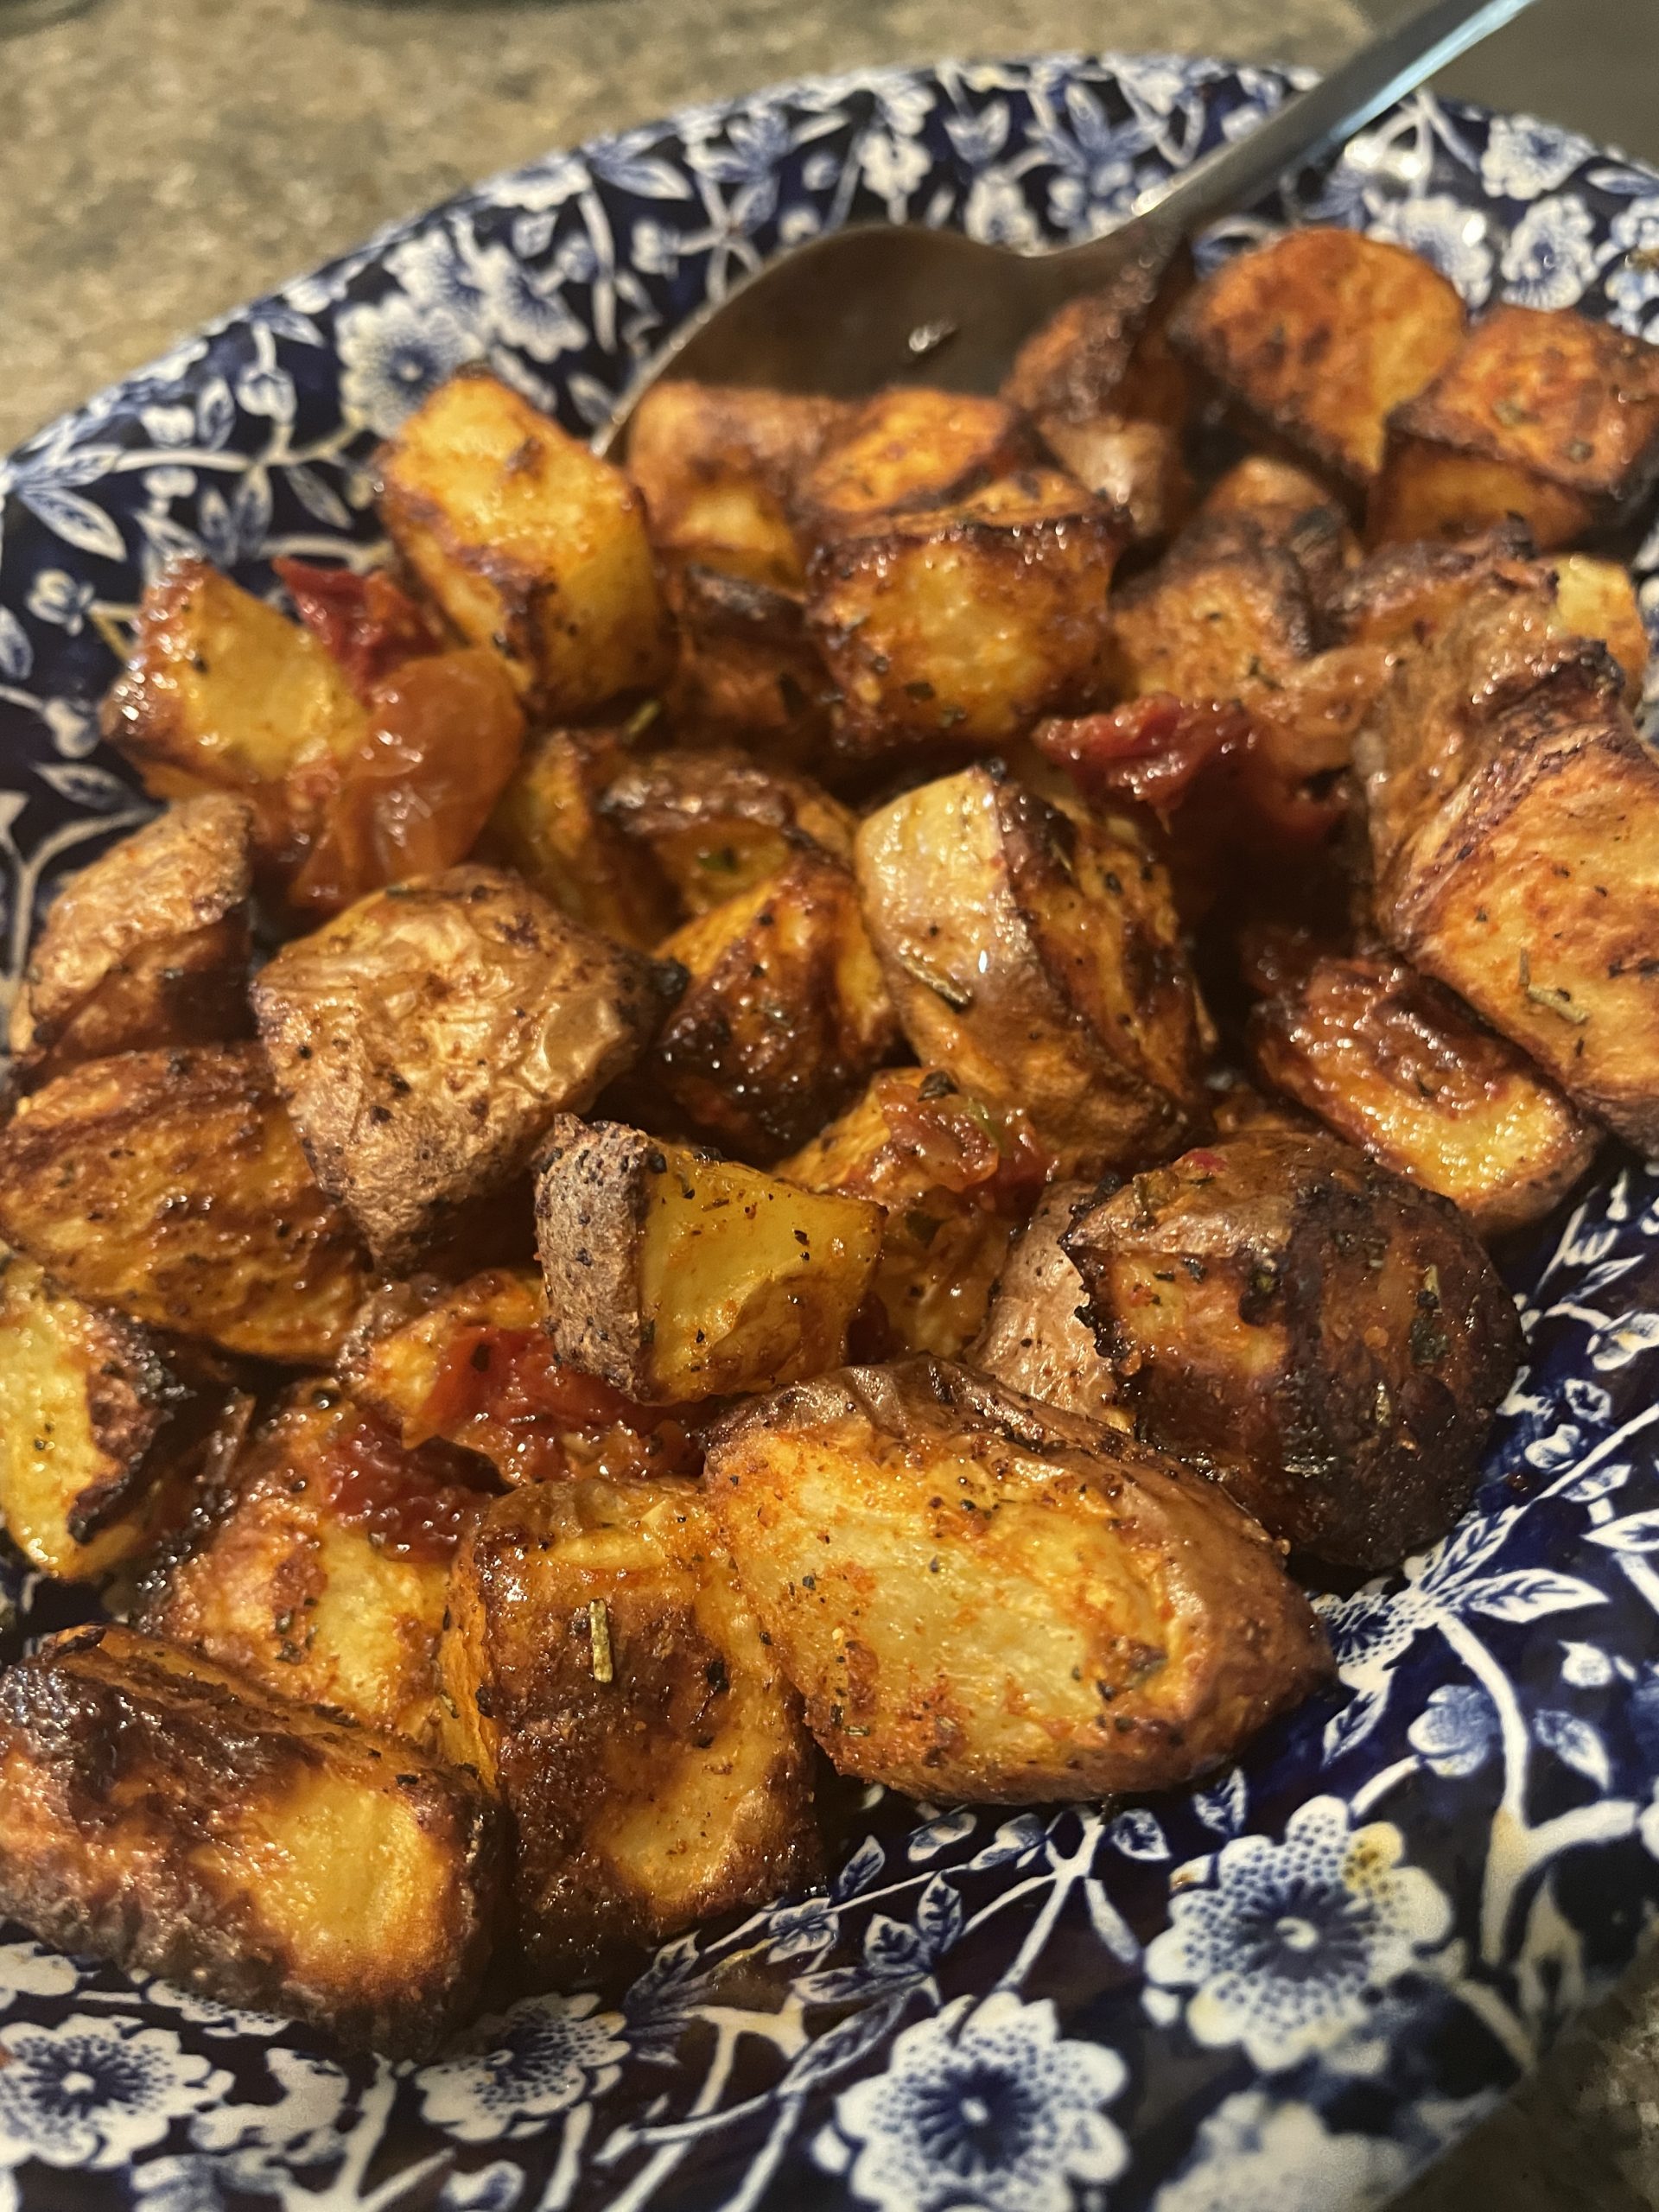
First, the potatoes are scrubbed but left unpeeled and cut into chunks. I coat these very lightly in olive oil and season liberally with herbs, chili flakes and smoked paprika. Into the air fryer they go, until they are crisply golden. As they emerge from the oven, they get a quick toss with oil packed sun-dried tomato bits and sherry vinegar. And that’s it. Serve ‘em up beside roasted veggies, mushrooms or perhaps a filet of grilled fish. Or whatever else you nestle your potatoes up to!

Are they the real thing? Heavens, no! But the crisp texture and rich flavors are there, which is all I need- until I hit up another tapas restaurant.  

Cheater’s Patatas Braves

Spicy, smoky air fried potatoes with herbs and sherry vinegar
Prep Time20 minutes
Cook Time30 minutes
Total Time50 minutes
Course: Side Dish
Cuisine: Spanish
Keyword: smoky, spicy
Servings: 4

Ingredients

  • 1 lb potatoes Yukon golds are great
  • 2 tsp extra virgin olive oil
  • 1/2 tsp rosemary
  • 1/2 tsp smoked paprika
  • 1/4 tsp onion powder
  • 1/8 tsp garlic powder
  • 1/4 tsp chili flake
  • 1/4 tsp ground coriander
  • 1/2 tsp oregano
  • 1/2 tsp salt
  • 1/4 tsp pepper
  • 1 tbsp oil packed sun-dried tomatoes, chopped
  • 2 tsp sherry vinegar

Instructions

  • Cut the potatoes, unpeeled, into 1/2-inch cubes, and toss with the olive oil to coat. Mix the dried herbs and seasonings together, then toss into the potatoes, stirring to distribute evenly.
  • Spread the potatoes out in the air fryer basket. Air fry the potatoes for 20-25 minutes, checking for doneness after 20 minutes. When crisply tender, remove from the air fryer and pour into a bowl. Mix the tomato bits and vinegar together, then pour over the potatoes and toss to distribute the flavor. Serve hot.

Notes


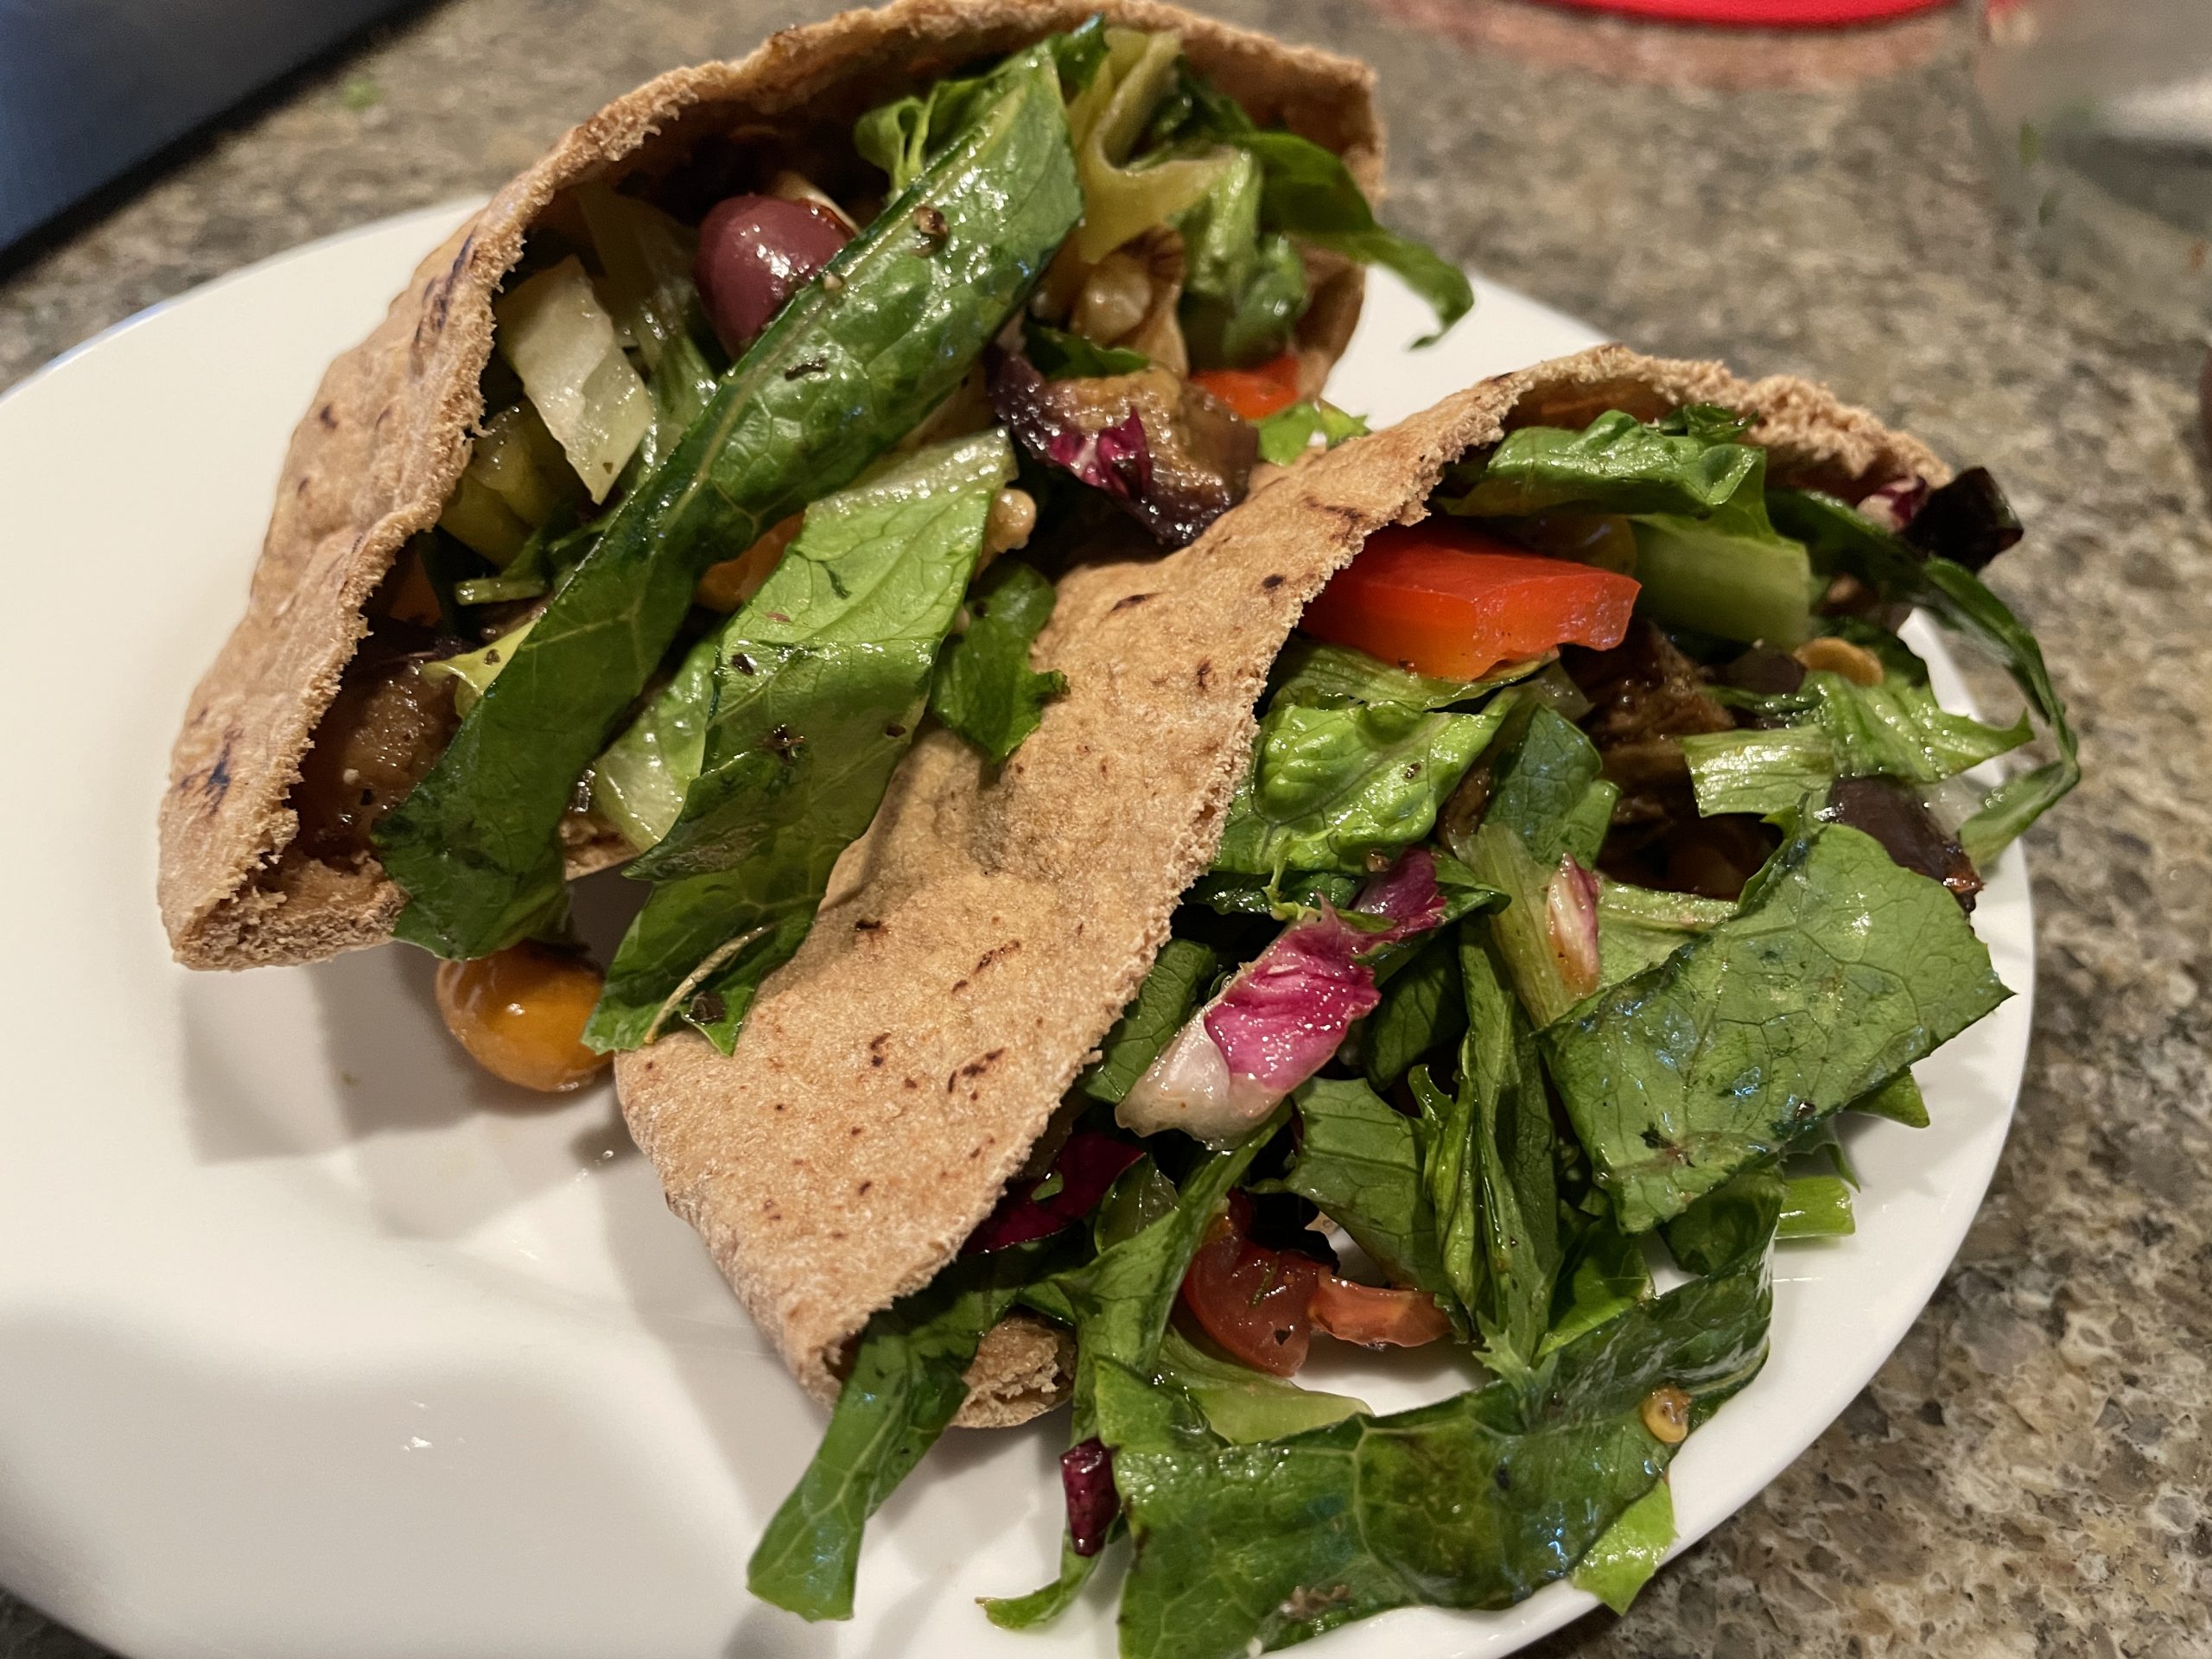
Italian Salad Pita Sandwiches

Italian Salad Pita Sandwiches

Autumn is my favorite season, and September is right around the corner. My midwestern persona rejoices in the upcoming cooler weather, while my Arizona persona reminds me that cooler weather just might arrive by mid-October here in the Sonoran desert…yes, it’s that time of year when the heat just keeps on giving, and “cooking” becomes more like “assembling.” I like pulling cool, crisp salad meals together, more from a template than a recipe. And preferably from what’s already in the pantry and fridge. When warm weather menus require actual cooking, my new-ish toaster oven/air-fryer has been a real hero, keeping the kitchen much cooler than turning on my oven.

Mom was a big fan of the toaster oven. I never really got hold of her enthusiasm; the toaster oven took up considerable counter space, and seemed to duplicate other appliances already in her kitchen. But after seven long hot Arizona summers I finally get it, though it took the toaster oven/air-fryer combination to convince me to buy one. But I am now sold. I’m sure Mom is having the last laugh, but I’ll take it since I have turned on my large oven no more than three or four times all summer. Today an easy, quick roast of eggplant and Lupini beans made a great addition to my Italian Salad Pita Sandwiches. And the rest came straight from the fridge. 

I saw a template for an Italian chopped salad in the newspaper several years ago. We’re both fans of Italian antipasti, and I figured if I could add enough heft, it just might pass as dinner. The best thing about it is that the components are negotiable. While I’m inserting a “recipe,” it’s seldom the same from one time to the next.

Lettuces, tomato and olives are staples that make up the base of the salad. I’m using Lupini beans today, but it could just as easily be a can of chickpeas or cubes of pancetta. I love the hard Italian cheese cubes, but mozzarella is delicious too. Vegans might use tofu feta in place of the cheese. It’s roasted eggplant today, but jarred marinated artichokes might fill that spot next time. Pepperoncini and half a sweet red pepper are waiting to be eaten, and in they go. Crispy packaged chickpeas and walnuts add crunch. The final salad is lightly dressed before being stuffed into split pita breads. 

When asked what’s for dinner, I’m always surprised at the enthusiastic reception these sandwiches get. I guess that something this simple really can be dinner. 

Italian Salad Pita Sandwiches

Cool, crisp Italian antipasti dinner salad stuffed into whole wheat pita breads.
Prep Time30 minutes
Total Time30 minutes
Course: Entree Salad, sandwich
Servings: 4

Ingredients

Sandwiches

  • 1 small eggplant, cut into 3/4-inch cubes
  • 1 cup jarred brined Lupini beans, in their skins
  • 1 tbsp olive oil
  • Salt
  • 6 cups lettuce, coarsely shredded I used mix of romaine, spring mix and radicchio
  • 1 cup grape tomatoes, halved
  • 1/4 cup thickly sliced jarred pepperoncini
  • 2 oz hard Italian cheese, cut into cubes I used Grana Padang
  • 1/2 cup sweet red pepper, coarsely chopped
  • 1/2 cup thinly sliced red onion
  • 1/2 cup packaged crispy chickpeas
  • 1/4 cup coarsely chopped walnuts
  • 4 whole wheat pita breads, halved and pulled open

Dressing

  • 1/4 cup extra virgin olive oil
  • 2 tbsp red wine vinegar
  • 3/4 tsp Italian herb mix basil, oregano, fennel seeds
  • 1/4 tsp salt
  • 1/4 tsp chili flake

Instructions

  • Preheat the oven to 375 degrees, using an air fryer or convection if possible. Toss the cubes of eggplant and Lupini beans with the olive oil on a sheet pan, and sprinkle with salt. Roast for 20-25 minutes, until the eggplant is tender and the Lupini beans slightly crisped. Set aside to cool.
  • Toss the remaining salad ingredients together in a large bowl. Add the eggplant and Lupini beans. Whisk the dressing ingredients together and toss with the salad. Divide the salad between the halved pita breads, and serve. Two pita halves per serving. 

Notes

I’m skipping the nutritional value this month, as it will vary considerably with different combinations of ingredients and different brands of pita bread.

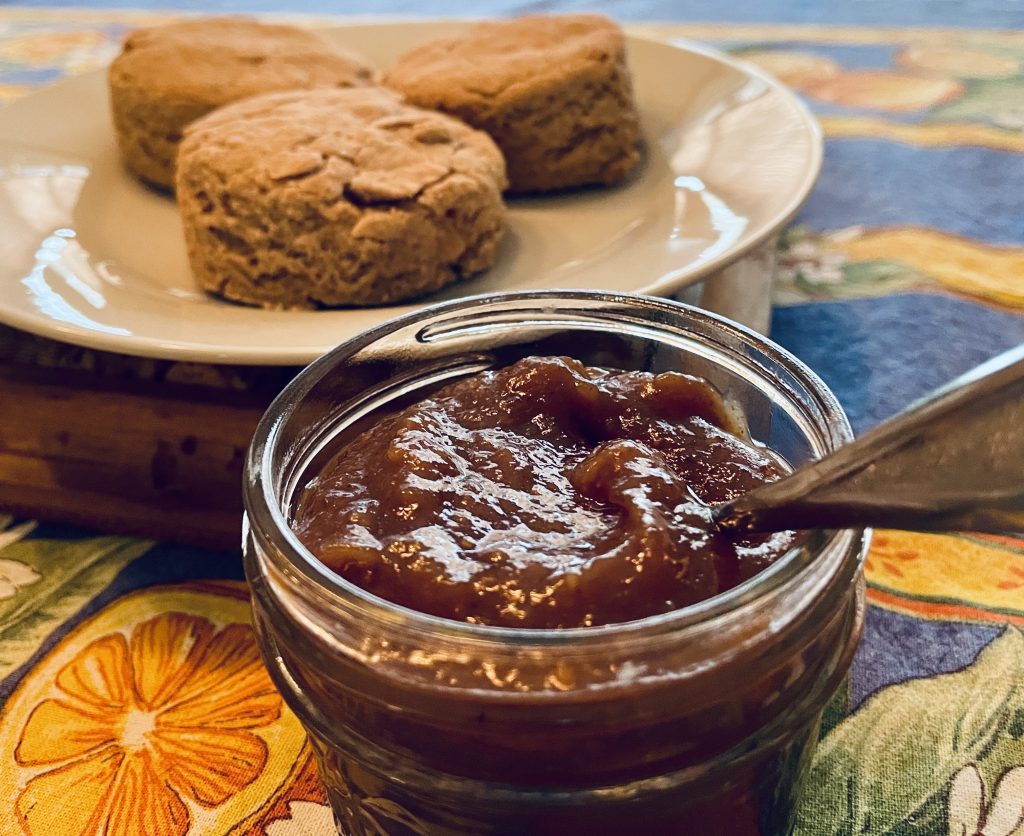
Mom’s Whole Wheat Biscuit with Spiced Fig Butter

Mom's Whole Wheat Biscuits with Fig Butter
Mom’s Whole Wheat Biscuits with Fig Butter

My mom’s biscuit was probably not yo’ mama’s biscuit… no AP flour, no shortening or butter, no flaky layers, no poppin’ tube. No, hers was a whole wheat biscuit, made about as healthy as one can make a biscuit, with whole meal flour and unsaturated vegetable oil. Not my childhood favorite, but it’s the biscuit I wanted when I whipped up some Spiced Fig Butter this morning. On the farm, we often piled deliciously spicy apple butter on those wheaty biscuits. And suddenly I’m rooting through my recipe box for that weathered recipe written in her hand.  

The fickle fig has returned this year, following its non-appearance last summer. Figs seem to be a feast or famine fruit; there either are none, or I’m drowning in them. And due to their short shelf life, they must be eaten quickly or preserved in some fashion. Thus far, they’ve been eaten out of hand, frozen into fro-yo, roasted savory style with onions and fennel and simmered into today’s fruit butter. 

Fruit butters are different from jams and jellies. Smooth, less sweet spreads that glide over a biscuit or slice of toast like butter.  The fruit is lightly sweetened and cooked to sauce consistency. Spices are added, and the sauce is simmered to reduce, caramelize the sugars and concentrate.  Finally the mixture is blended to that smooth buttery consistency. Apple butter is probably the best known fruit butter, which takes long slow watchful cooking. Having made it many times, I was surprised how quickly and easily the fig butter came together. Figs are soft fruits which cook down into sauce and concentrate into fruit butter very quickly. They are also natural partners for the flavors of port, honey and warm spices. 

This fig butter has remarkable versatility. While I’m showcasing it on biscuits, it’s delicious stirred into yogurt, oatmeal or chia pudding. I suspect it would be an enthusiastic member of a charcuterie board, or as a side to savory roasted dishes. I’m going to run out before I exhaust its many applications… time to search out more figs!

Mom’s Whole Wheat Biscuits with Spiced Fig Butter

Biscuit with mild, nutty flavor of whole wheat, topped with port infused spiced fig butter.
Prep Time30 minutes
Cook Time40 minutes
Total Time1 hour 10 minutes
Course: Breakfast, Quick Bread
Keyword: cinnamon, figs, Whole Wheat
Servings: 9

Ingredients

Spiced Fig Butter

  • 9 fresh figs, stemmed and quartered
  • 2 tbsp honey
  • 1 tbsp port wine
  • 1/4 tsp cinnamon
  • 1/4 tsp anise seed
  • 1/8 tsp cardamom
  • 1/4 cup water
  • 1 pinch salt
  • 1 tsp balsamic vinegar

Whole Wheat Biscuits

  • 2 cups whole wheat flour
  • 1/4 tsp salt
  • 3 tsp baking powder
  • 2/3 cup almond milk
  • 1/3 cup vegetable oil I used avocado oil

Instructions

  • In a small saucepan, combine the figs, honey, port, spices and water; stir in the pinch of salt. Bring to a boil, cover and reduce the heat to simmer. Simmer for 20-30 minutes, or til the fruit is soft. Cool slightly, then blend to a smooth consistency with an immersion blender or blender. Stir in the vinegar and chill. Makes 1 cup fig butter.

Biscuits

  • Preheat the oven to 425 degrees Fahrenheit. Lightly grease a 9-inch cake pan or cookie sheet. Combine the dry ingredients in a large mixing bowl. Whisk together the almond milk and oil, and add all at once to the dry ingredients. Stir lightly into a ball. Roll out on a lightly floured surface to 1/2-inch thickness. Cut into 9 biscuits and place into the prepared pan/baking sheet. Bake for 12-15 minutes.

Notes

1 biscuit with 1 tablespoon fig butter:
  • Calories: 203
  • Total Fat: 8.5 grams
  •      Saturated Fat: 1 g
  • Cholesterol: 0 mg
  • Sodium: 283 mg
  • Total Carbohydrate: 28
  •      Fiber: 1.75 g
  •      Sugars: 8.8 g
  • Protein: 2.8 g 

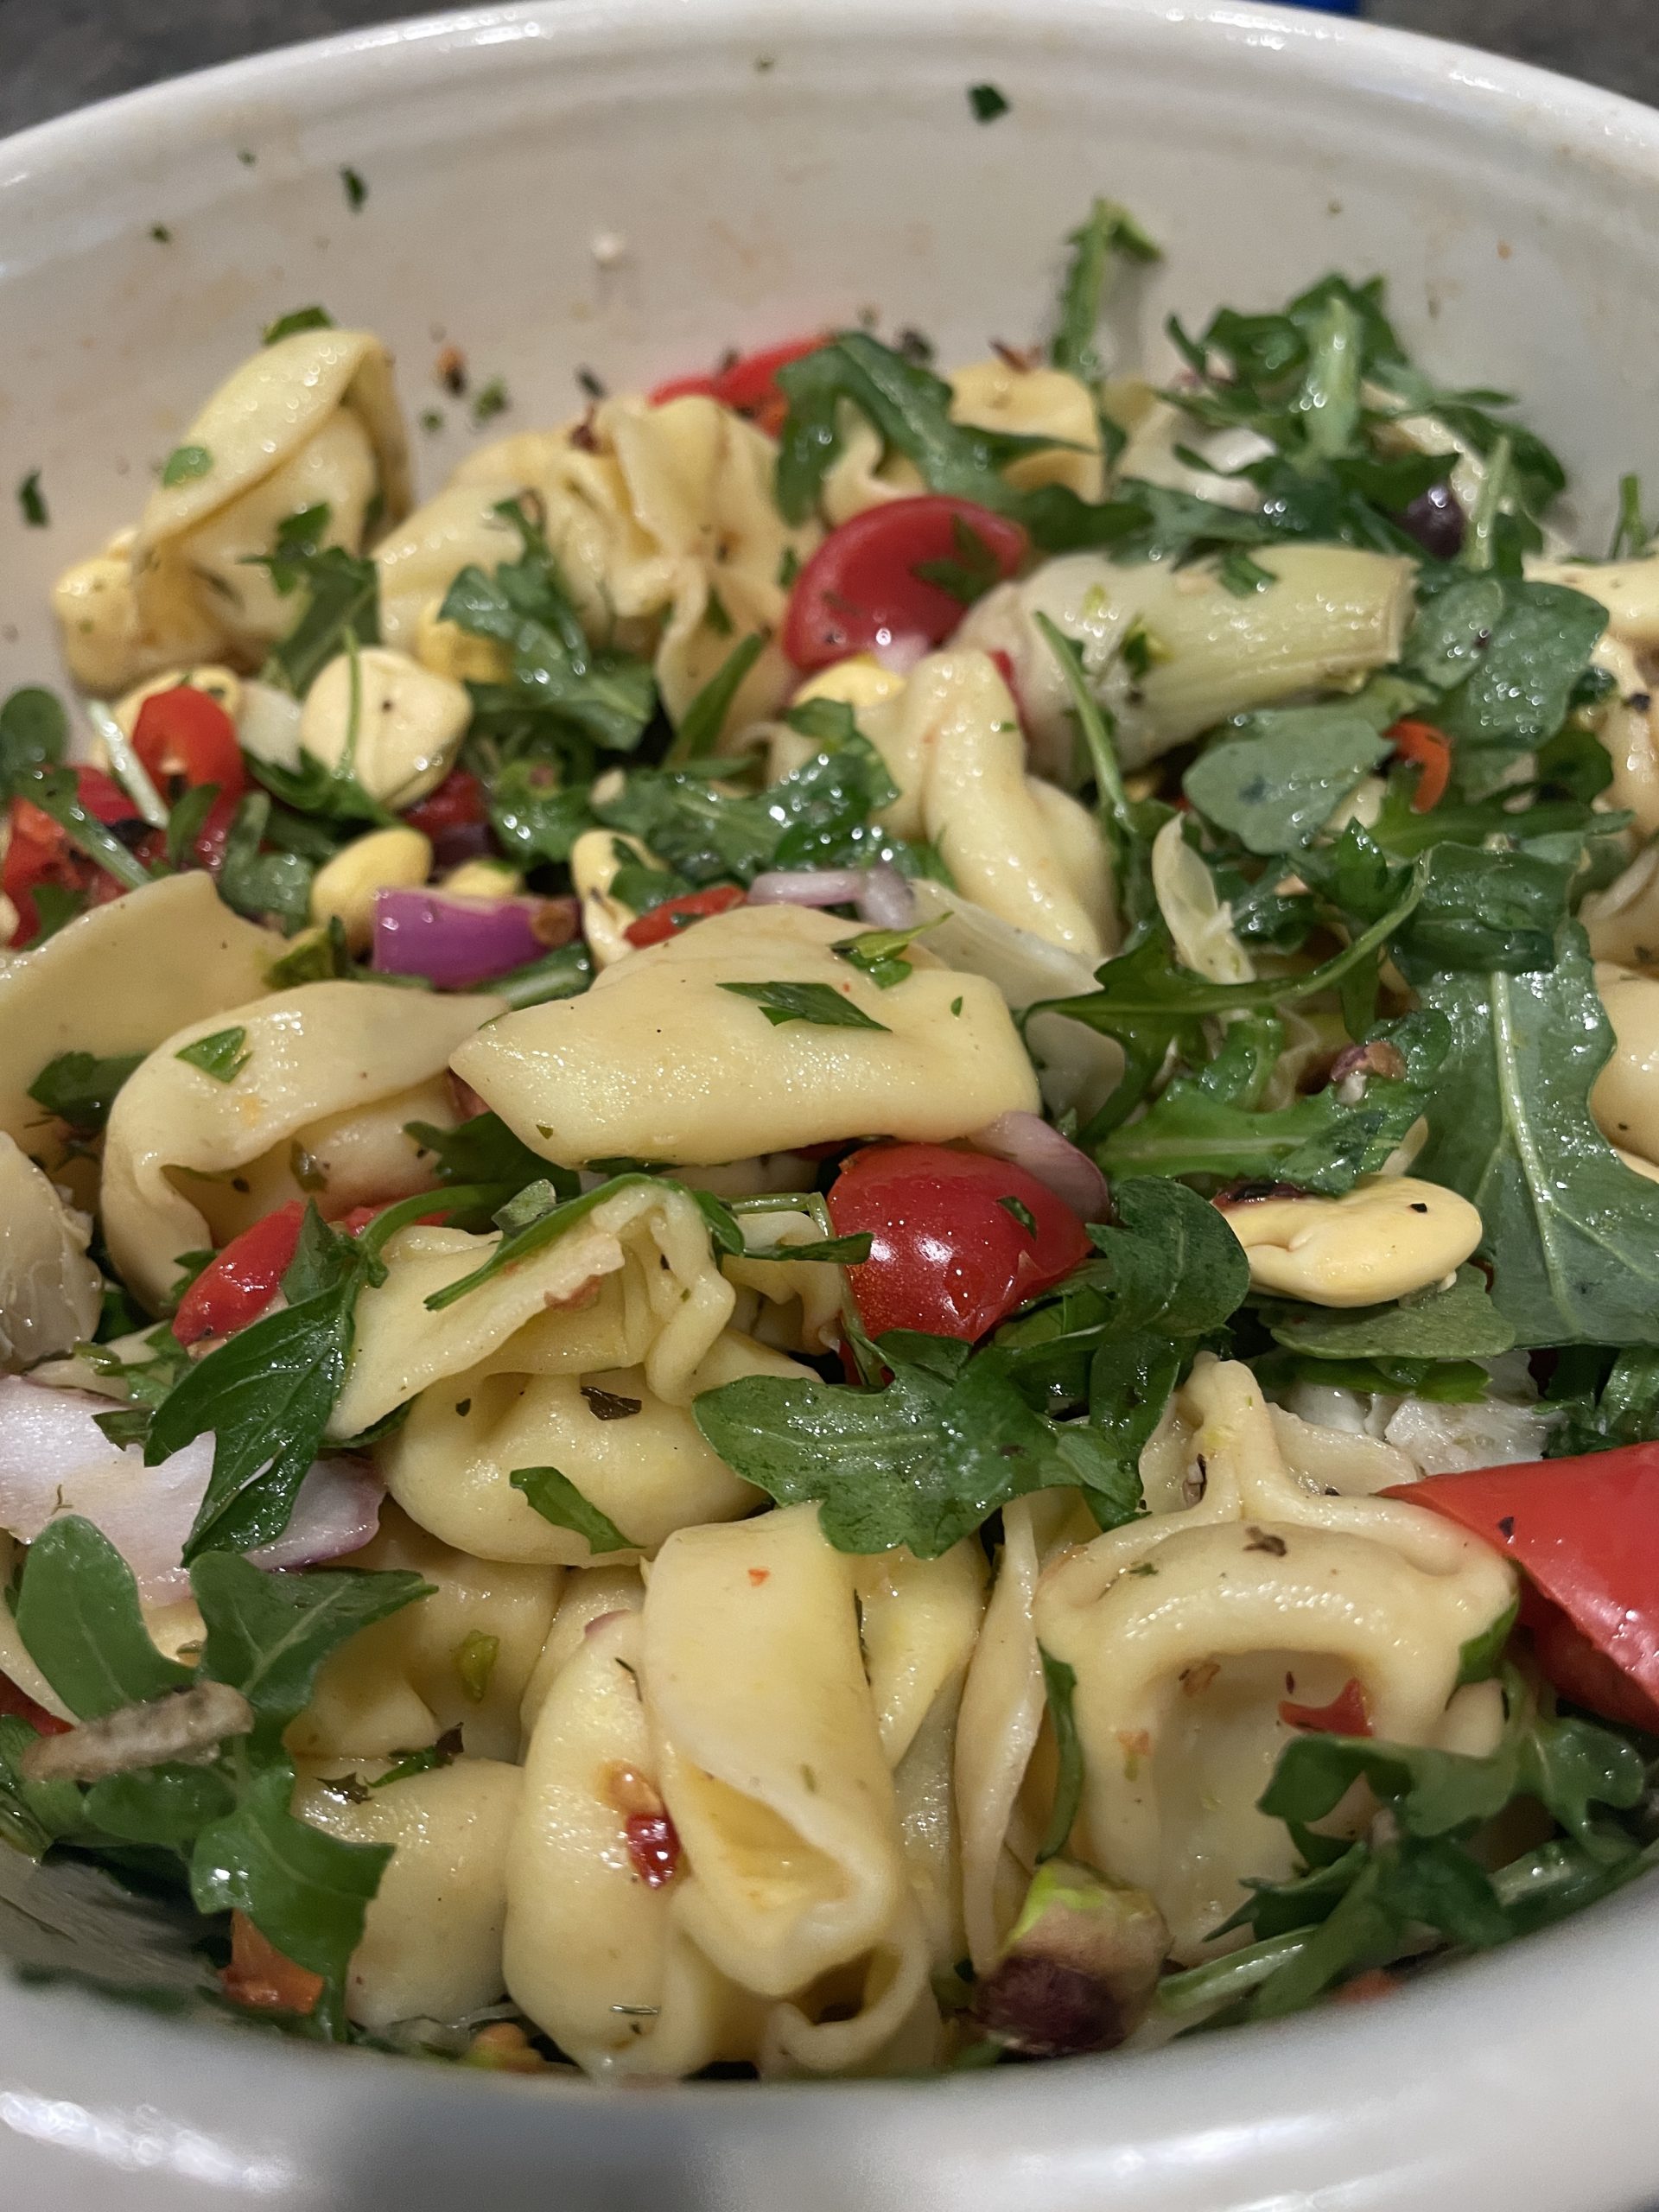
Tortellini Pasta Salad

Tortellini Pasta Salad

Pasta salad wasn’t on the farmhouse menu. It simply wasn’t a dish that Mom made.  While I might see it at a pot luck, it undoubtably used mayonnaise, so I’d give it a pass. But lighter, fresher versions came around and suddenly I’m all in. My tortellini pasta salad combines fresh tortellini pasta with all the yumminess of an Italian antipasto plate. It also includes a relatively new-to-me ingredient called lupini beans. But as it turns out, most Italians along with others of the Mediterranean basin are quite familiar with these beans. 

I’m always on the lookout for plant sources of protein to “beef” up my plant based menus, so to speak. Thinking I knew all the usual suspects-beans, lentils, tofu, seitan, nuts, seeds and grains-I was surprised to hear Mark Bittman hawking Brami lupini beans on his podcast, Food. High in protein and fiber, low in fat and carbs, full of vitamins and minerals, with an almost crisp texture and very neutral flavor. Not remotely what I think of as a bean.

Lupinis are a bit high maintenance to prepare; they must be boiled, then soaked and drained repeatedly until the bitter alkaloids have soaked out, much like preparing fresh olives from scratch at home. I’ve done this… and I prefer buying them already prepared and brined in bottles. A visit to my local Italian market or Mediterranean store always results in several bottles of lupini beans being added to the order. 

Lupinis have evidently been a staple food in Italy, the Middle East and South America for centuries. Today they are apparently eaten mostly as a healthy snack, sold as street food or at fairs. But they offer up everything I am looking for in a protein ingredient. And into the pasta salad they went, along with all the antipasto, some arugula, and cubed Manchego. (You might have noticed that cheese is my not even remotely plant based Kryptonite.) Tossed with a simple vinaigrette and fresh herbs, this sits quite comfortably in the center of my plate for a delicious, refreshingly cool summer dinner. 

As is the case for most pasta salads, you can modify to your heart’s content using what you might have on hand. In a meatier state of mind?  Replace the lupini with small cubes of pancetta. Use tortellini with other fillings, or use a totally different pasta. Substitute a dried and cooked pasta for the fresh type. Sub in Italian style giardiniera, cubes of zucchini or steamed broccolini. Make it vegan using vegetable filled tortellini and plant based cheese. Make it your own! But do make it. 

Tortellini Pasta Salad

Cool summer pasta salad entree with Italian antipasti and herbed vinaigrette.
Prep Time45 minutes
Total Time45 minutes
Course: Entree Salad, Salad side dish
Cuisine: American
Keyword: antipasti, tortellini
Servings: 4

Ingredients

  • 12 oz fresh tortellini pasta filling of choice
  • 3/4 cup chopped tomato or halved grape tomatoes
  • 6 large bottled artichoke hearts, rinsed, drained and quartered
  • 2/3 cup bottled lupini beans, rinsed and drained, popped out of the peels
  • 1/2 cup sliced pepperoncini, rinsed and drained
  • 1/3 cup sliced Kalamata olives
  • 1/3 cup sliced red onion
  • 2 cups fresh arugula, packed
  • 1/2 cup Manchego cheese, cubed into 1/4-inch pieces
  • 1/2 cup finely sliced fresh basil

Herbed Vinaigrette Dressing

  • 3 tbsp extra virgin olive oil
  • 2 tbsp white wine vinegar
  • 1/4 tsp salt
  • 1/4 tsp finely ground pepper
  • 1/2 tsp Chili flake
  • 1/2 tsp each dry basil, oregano and dill

Instructions

  • Whisk together all ingredients for the dressing
  • Combine the salad ingredients in a large bowl. Pour over the dressing and toss to coat.

Gingerbread

The apple doesn’t always fall near the tree. Take my proper mother and her decidedly less proper mother. Grandma owned a small brick ranch house in the little town nearest our farm, and I spent a great deal of time with her. She was the best antidote I had to the isolation of farm living. Grandma was my main confidante, listening to my childhood sob stories as though they were enthralling tales. (They were not.) She was the very image of the grandmother who goes above and beyond to spoil her granddaughter. 

Grandma was, I suspect, a woman born far ahead of her time. She lived her life during times challenging to be a woman; but she devised clever ways to detour around the obstacles to her benefit. She was also my first role model of a single woman who lived happily and independently.  Grandma had a lovely group of friends with whom she spent time chatting and playing cards. Watching her daily “story,” (aka soap opera) was top priority. She was wont to spout her thoughts openly, generously sprinkled with German curse words and colorful expressions. (My favorite of these has always been “well, shit and box it.”)

Unlike Mom, Grandma was not a  cook. Don’t get me wrong, she had cooked her entire life for her family. She made a mean pot roast, with all the trimmings. But living alone, I suspect she was done with the whole cooking schtick. She embraced convenience foods as manna from heaven. A Sara Lee cheesecake lurked in her freezer at all times. While she would make or buy me any unhealthy dish my heart desired, I seldom saw her eat much herself. She appeared to survive to the age of 93 on coffee, cigarettes and a nightly bedtime tonic of gin. But there were a few family recipes that were hers, with a decided Amish influence. 

Grandma would tell you that she was of German heritage. Recently, I’ve tracked her ancestry to Alsace Lorraine, an area which changed borders between France and Germany a number of times through history. Her great grandparents were born in Germany and died in France, without ever moving! Her grandfather came to the new world and married a woman from eastern Pennsylvania, home to a large Amish community, hence the recipes.  One of my favorites is her gingerbread.

Grandma’s gingerbread was a frequent dessert on the farm. While light and spicy,  I felt the recipe could benefit from a few swaps. It called for melting shortening in boiling water, but the shortening of Grandma’s era was full of trans fats, no longer on the market. Shortening still exists, but the trans fats have been replaced with saturated fats, not much of an improvement. I decided to use a touch of butter for flavor and oil for the remaining fat. A mix of half all purpose flour and half whole grain spelt flour wasn’t even noticeable in the finished cake. But the real surprise was the molasses. While Grandma and Mom both used  the lightest grade of molasses, I had only blackstrap molasses in my cupboard. When I pulled the cake from the oven, it was a bit sunken in the middle, like a flourless chocolate cake. And indeed, this gingerbread had a deep, almost smoky essence of molasses, with a moist, fudgy crumb. It was both different and delicious. 

This gingerbread is quick and easy to make, a good dessert to have in the recipe box. Make it to your taste with light, medium or blackstrap molasses. I like it served with lemon curd, but whipped cream and chocolate sauce are other possible toppings. But you might also find that it’s delicious served warm from the pan, just plain.

Gingerbread

Deep dark gingerbread, redolent with the smoky essence of dark molasses, with a moist and fudge crumb.
Prep Time20 minutes
Cook Time35 minutes
Total Time55 minutes
Course: Dessert
Keyword: cake, Molasses
Servings: 12

Ingredients

  • 1/2 cup boiling water
  • 2 tbsp butter
  • 6 tbsp avocado oil
  • 1/2 cup molasses
  • 1/2 cup brown sugar
  • 1 large egg, beaten
  • 3/4 cup all-purpose flour
  • 3/4 cup whole grain spelt flour
  • 1/2 tsp salt
  • 1/2 tsp baking powder
  • 1/2 tsp baking soda
  • 3/4 tsp ground ginger
  • 3/4 tsp cinnamon

Instructions

  • Preheat the oven to 350 degrees F. Grease and flour an 8-inch around cake pan, or line with parchment paper.
  • Pour the boiling water over the butter to melt, then add the oil. allow to cool several minutes, then add the molasses, brown sugar and eggs. Beat well to combine.
  • In a separate bowl, combine the remaining dry ingredients.
  • Pour the dry ingredients into the wet ingredients, stirring well to mix. Pour batter into the prepared pan. Bake in preheated oven for 30-35 minutes, until a toothpick inserted in the middle comes out clean. Cool in the pan for 15 minutes before slicing.

Notes

  • Calories: 157
  • Total Fat: 9.5 grams
  • Saturated Fat: 2.2 g
  • Cholesterol: 21 mg
  • Sodium: 245 mg
  • Total Carbohydrate: 30 grams
  • Fiber: 2 g
  • Protein: 2.1 g

Hot Cross Buns

Hot Cross Buns

TBH, I’d planned my next post to present a vegetable side dish of broccoli. But yesterday the hot cross buns- Mom’s hot cross buns-emerged from the oven, all puffy and glistening, pushing all thoughts of broccoli right out of my head. 

Easter on the farm was much like other religious holidays; 20% religion and 80% traditional cultural practices. You know, the fun stuff. My youthful priorities for the holiday were: 

1. Wearing my new Easter outfit, if it was warm and dry enough. (It wasn’t.)

2. Running to check for the early arrival of the Easter Bunny. (Guaranteed.)

3. Eating hot cross buns for breakfast. (More than likely, yes.)

Actually, hot cross buns pre-date Christianity, originating in pagan religions. But they seemed such a fine fit for Good Friday, that they were co-opted as a symbol of Easter. But no matter how you view them historically, they remain a delicious holiday staple. 

I have no idea where this recipe came from, simply a hand written recipe card with no credit given. But Mom’s hot cross buns were, and remain today, the best ones I have ever tasted, and I have tasted a few over the years. Beautifully risen, puffy and light, with just the proper amount of spice.

They are a bit of a splurge at our house, given the butter, white flour and icing. I will admit to trying to make them healthier in years past, but the quality is not the same and ultimately not worth it for a one time a year indulgence. This year I did have the remains of a bag of finely milled farro flour from my favorite local grains purveyor, Hayden Flour Mills. I blended the farro flour into my Sonoran white wheat for both flavor and color, but Mom used plain old all purpose flour, and that’s fine. And of course, I macerated the currents in brandy, of which Mom would not only approve, but would wonder why she didn’t think to do so herself…

Given the lateness of my inspiration, if you bake the buns it won’t be in time for Easter. But neither the holiday nor the buns will mind if they hit the table a bit late. I don’t think you’ll mind much, either. 

Hot Cross Buns

Puffy, tender sweet roll spiced with cinnamon and nutmeg, with a criss-cross of vanilla icing.
Prep Time2 hours 30 minutes
Cook Time20 minutes
Total Time2 hours 50 minutes
Course: Breakfast
Cuisine: English
Keyword: Easter
Servings: 8

Ingredients

  • 1 packet active dry yeast 1 packet is 2 1/4 teaspoons
  • 1/4 cup very warm water
  • 1/4 cup butter, unsalted
  • 1/3 cup milk I use oat milk
  • 3 tbsp sugar
  • 1/2 tsp salt
  • 1 large egg
  • 1/2 cup currants, dried
  • 1 tbsp brandy optional
  • 2 1/4 cups all purpose flour
  • 1/4 tsp ground cinnamon
  • 1/8 tsp ground nutmeg

Icing

  • 1 1/2 tbsp butter, unsalted room temperature
  • 1/2 cup confectioner's sugar sifted
  • 1/2 tsp vanilla extract
  • milk

Instructions

  • Sprinkle the yeast into the warm water in a large mixing bowl. Set aside to proof.
  • If using the brandy, mix into the currants and set aside to macerate.
  • Melt the butter, then stir in milk, sugar and salt, stirring to dissolve the sugar. Cool, then stir into the yeast.
  • Beat the egg. Measure and reserve 1 tablespoon for brushing the buns before baking. Stir remaining egg into the yeast mixture, along with the currants.
  • Mix the flour with the spices. Add gradually to the yeast mix, adding just enough to make a soft dough. If additional is required, add by the tablespoon until the dough can be kneaded.
  • Turn out onto a lightly floured surface and knead until smooth and elastic, adding only enough flour to keep from sticking. The mixing and kneading can be done using a strong mixer with dough hook.
  • Place the dough into a lightly buttered bowl, brush top with butter and cover with a clean kitchen towel. Let rise in a warm place until doubled, about 1 hour.
  • Turn out and divided evenly into 8 pieces. Shape each piece lightly into a ball. Place the balls of dough onto a baking sheet lined with parchment paper. Cover and set aside to rise, about 45 minutes. Preheat the oven to 350 degrees F. Brush the risen rolls lightly with the reserved beaten egg.
  • Bake for 15-20 minutes, until puffed and brown. Cover with a sheet of foil if the rolls are browning too quickly.
  • Remove rolls from the oven and cool on a wire rack.
  • Beat the confectioner's sugar into the butter with the vanilla. Add milk by drops until spreadable consistency. Additional confectioner's sugar may be added as desired for a stiffer icing for piping. Spread or pipe onto the warm rolls.

Notes

  • Nutrition Facts:
  • Calories: 256
  • Total Fat: 5.1 g
  •    Saturated Fat: 2.6 g
  • Cholesterol: 55 mg
  • Sodium: 169 mg
  • Total Carbohydrate: 47.7 g
  •    Fiber: 1.9 g
  •    Total sugars: 19.8 g
  • Protein: 5.8 g

Farro Minestrone

Farro Minestrone

“What should we have for dinner?”

For many, this is one of life’s toughest questions. With her well stocked freezer and pantry, my mom seemed to always know what we’d be eating, perhaps one day in advance. I never saw her write it down; she would simply get an item from the freezer to defrost each night. Once she returned to work, she left me with daily instructions for getting dinner started before she got home. But she was planning meals that revolved around the standard meat-starch-vegetable meal pattern. Easier than a plant based meal pattern. 

No matter my meal pattern of the moment, I’ve always been a write-it-down person. When friends see my neatly scripted menu plans for the week, they either think I’m a genius or a nutcase! But an hour’s worth of planning time eliminates daiIy 5:00 pm anxiety, keeps the food waste to a minimum, and prevents those desperation “out to eat” days. (Well. Mostly.)

I have shelves packed tightly with cookbooks. Several of my favorites, particularly those of Mollie Katzen and Anna Thomas, include menus. While I might not prep those menus verbatim, they offer insights into how to combine mostly plants into satisfying meals. New winter meal patterns have become my go-tos: legumes and vegetables, soup and salad, stir-fries and curries, pasta and salad. And much like most folks’ classic meal rotations, I find that certain plant based dishes have become keepers, appearing relatively often. 

Today’s Farro Minestrone fits that niche. The recipe includes a sofrito, broth and tomato base, with additional vegetables and cannellini beans. The nutty, chewy whole grain farro replaces the typical pasta. Dried mushrooms and smoked paprika provide umami, along with an optional stealth ingredient, a piece of parmesan cheese rind. The hardened cheese rind becomes soft and melty with slow simmering. Once softened, the rind can be removed or chopped into small pieces and aded back into the soup. If the cheese is omitted, the recipe is vegan. (I pretty obviously wouldn’t do this…) But it’s all about personal preference. 

I once had a much younger, tech savvy friend inform me that I was sitting on a gold mine; that people would buy my menu plans. Sure enough, menu planning services have popped up online-for a fee, of course. I missed the chance to laugh my way to the bank…so in adding a Menus page to my blog, I’m offering up a freebie. The inaugural edition features cool weather menus. There are countless ways in which to eat a plant based diet, but this will give you a peek into how we do it at our house. 

No matter how you figure your menus, slot this soup into one of your evening meals. I think it’s a keeper. 

Farro Minestrone

Hearty, satisfying Italian style soup with farro, cannellini beans, porcini mushroom and parmesan.
Prep Time1 hour
Cook Time1 hour
Total Time2 hours
Course: Entree
Cuisine: Italian
Keyword: farro, minestrone, soup
Servings: 6

Ingredients

  • 1/2 ounce dried Porcini mushroom
  • 1 tbsp olive oil
  • 1 cup onion, coarsely chopped
  • 1 cup carrots, chopped
  • 1/2 cup celery, chopped
  • 2 tsp dried Italian seasoning
  • 1/4 tsp garlic powder
  • 1 tsp smoked paprika
  • 1 medium piece Parmesan cheese rind
  • 1 quart broth or stock vegetable or chicken
  • 3/4 cup whole grain farro
  • 1 14.5 oz can diced tomatoes
  • 1 15 oz can cannelloni beans, rinsed and drained
  • 1 medium zucchini, cut into small cubes
  • Salt and pepper to taste
  • 1 tbsp balsamic vinegar
  • 3 tbsp fresh parsley, chopped plus extra for garnish

Instructions

  • Place the dried Porcini mushrooms in a medium bowl. Cover with 1 1/4 cups boiling water and set aside to hydrate.
    In a large soup pot, heat the olive oil over medium high heat. Stir in the onion, carrots and celery and cook for several minutes to soften. Add the seasonings, broth, farro and cheese rind. 1/2 teaspoon of salt can be added at this point, depending on the saltiness of the broth being used. Bring to a boil, then reduce to simmer. Simmer for approximately 45 minutes, or until farro is tender.
    Add tomatoes with their juices, drained beans and zucchini. Drain the mushrooms, adding the mushroom broth to the pot. Chop the mushrooms and add to the pot. Simmer for 15 minutes, until zucchini is tender. Stir in the parsley and balsamic vinegar. Season to taste with salt and pepper. Fish out the cheese rind and either chop finely to return to soup, or omit.
    Serve, topped with extra chopped parsley sprinkled on top.

Notes

  • Nutrition Facts
  • Calories per serving 320
  • Total Fat 18 g; saturated fat 3.5 g
  • Cholesterol 6 mg
  • Sodium 310 mg
  • Total Carbohydrate 29 g; fiber 8.5 g; tota sugars 3 g
  • Protein 11.3 g 

Lentils and Mushrooms in Burgundy

Lentils and Mushrooms in Burgundy

As I write this, winter storms are raging across the country, bringing a variety of generally uncomfortable weather conditions to all. Here, it’s a cold and rainy weekend in the desert southwest, with snow in the upper elevations. Summer here is downright hot. One can count on this. The winters are not nearly so predictable these days. I’m bundled up in a heavy sweater and fuzzy socks, much as I might have been on a winter’s day on the farm. Cue the comfort food again… On days like today, Mom cooked meaty rib-sticking stews and braises, to warm one from the inside out. One of her favorites was a long slow braise of beef in red wine, aka beef bourguignon. 

Tough meat has been braised in red wine since the middle ages; the acid in the wine in combination with long slow heat breaks down the tough connective fibers to produce a tender stew. Alcohol? Again? I, along with everyone who reads this blog, laughs at my propensity for using alcohol in my cooking. In fact, I learned to do this at my mother’s knee.

But there is method behind the madness, because alcohol is a flavor enhancer, much like salt or pepper. When one tastes a dish, the tongue can taste water soluble flavors. But one gets more complete flavor when the molecules are sensed in the nose as well. These aromas are carried by fat soluble molecules. Alcohol can bond with both types of molecules, broadening and expanding flavor considerably. The particular wine used in today’s stew recipe is Burgundy. Burgundies are French wine blends based on the pinot noir grape. I am not picky about the wine here; it does not need to be high end pinot noir. An inexpensive wine will produce a delicious stew with deep flavor. 

But… I’m not eating much beef these days, for both health and environmental reasons. So I’m looking for red wine to bridge my flavors using plant based ingredients. I’ve cooked lentils in red wine for many years, another of those recipes that came from somewhere now unknown. Served over mashed potatoes, it offers the rich burgundy fueled flavor without the meat. The lentils provide the protein, but I knew something was missing. When I recently glanced at Mom’s recipe, I realized what it needed was vegetables! Duh. Shallots, carrots and mushrooms “beefed” the recipe up significantly. (Pun intended, sadly.) I also tossed in some soaked dried mushrooms, to maximize the umami character and meaty texture. This stew, ladled atop my homemade mashed potatoes, is about as delicious as a plant based stew can be.  

Plant based diets continue to punch above their weight in the media, particularly as January is the home of “Veganuary.” I don’t pay much attention to such trends, as plant based dishes are on regular rotation in my kitchen year round. But whatever your dietary trends might be, this dish is a plant based winner. 

Lentils and Mushrooms in Burgundy

A rustic braise of hearty lentils and mushrooms, with the deeply rich taste of Burgundy, served over fluffy mashed potatoes.
Prep Time30 minutes
Cook Time1 hour
Total Time1 hour 30 minutes
Course: Entree
Cuisine: French
Keyword: lentils, mushrooms, rustic, wine
Servings: 6

Ingredients

  • 1/2 oz dried Porcini mushrooms
  • 1 lb Cremini mushrooms, cleaned and quartered
  • 2 tbsp Garlic infused olive oil
  • 4 small shallots
  • 2/3 cup onion, diced
  • 1/2 tsp dried thyme
  • 1/2 tsp dried marjoram
  • 1/2 tsp dried rosemary
  • 1/4 cup chopped parsley, divided
  • 2 tsp tomato paste
  • 2 bay leaves
  • 3/4 cup dry brown lentils
  • 2 cups Pinot Noir or Burgundy wine
  • 2 large carrots, cut into 3/4-inch chunks
  • 1 tbsp red wine vinegar
  • salt and pepper to taste
  • prepared mashed potatoes

Instructions

  • Add 1 cup of boiling water to the dried mushrooms in a small bowl and set aside to reconstitute. 
    Heat 2 teaspoons of the oil in a large skillet and sauté the mushrooms over medium high heat until golden, cooking off any liquid. Pour into a large bowl and reserve. Peel and thickly slice the shallots. Add 2 teaspoons oil to the skillet and sauté them until browned and tender. Add to the bowl with the mushrooms.
    Drain the dried mushrooms through a strainer, reserving the liquid. Slice the mushrooms and add to bowl with sautéed mushrooms.  
    Warm the remaining 2 teaspoons oil in the skillet and sauté the onion with the thyme, marjoram, rosemary and 2 tbsp of the parsley until the onions soften. Stir in the tomato paste, bay leaves, wine, reserved soaking liquid, lentils and carrots. Salt and pepper lightly. Bring to a boil, then lower heat and simmer while covered, 40 minutes to 1 hour, until lentils and carrots are tender. Stir in the reserved dried mushrooms, sautéed mushrooms and shallots with 1/2 tsp freshly ground pepper. Stir in the vinegar to sharpen the flavors. Taste and adjust the salt to your taste. Serve atop mashed potatoes. Sprinkle each serving with the reserved chopped parsley. 

Notes

  • Nutrition Information, with 3/4 cup mashed potatoes
  • Calories: 417
  • Total Fat: 11.6 g
  • Saturated fat: 2.2 g
  • Cholesterol: 2 mg
  • Sodium: 561 mg
  • Total Carbohydrate: 62.6 g
  • Fiber: 7.5 g
  • Total Sugars: 6.5 g
  • Protein: 10.8 g

Coconut Cake with Broiled Brown Sugar Topping

Coconut Cake with Broiled Brown Sugar Topping

Will there be cake? 

I have asked this question each year when my birthday rolls around, for some time. But tbh, when my mom came to an age and stage where she no longer could bake my birthday cake, I caved on it. Somehow baking one’s own birthday cake seemed a bit odd. I also thought that the birthday cake I counted on was simply too much work…

The birthday cake was a big double layer white coconut cake with fluffy white frosting. Originally, Mom grated fresh coconut to fold into the batter and sprinkle atop the frosting. Which, as I remember, was quite an effort. Eventually she developed a shortcut; dried shredded coconut, soaked in water to moisten and remove most of the added sugar from the fruit. It was a luscious birthday cake, one which I anticipated every year. 

But this year I remembered another cake that Mom served whenever an easy quickly made cake seemed in order. The recipe came off the back of the Bisquick box. The very fact that Mom kept a box of Bisquick baking mix in the pantry was a miracle; the cake was the only baked good I remember her using it for. Her actual biscuits were scratch made with whole wheat flour and wheat germ. The baking mix cake was a simple yellow cake, but had a brown sugar, coconut and pecan topping, which was popped under the broiler til it browned and bubbled. If you happen to be of quite advanced middle age like me, you might remember the Bisquick Velvet Crumb Cake

So I decided that after all these years, at this year’s birthday- there would be coconut cake. Tradition would be tossed out the window though, since I was baking this thing for just me and my husband. No, the big cake would be morphing into an easy single layer coconut cake with that delicious coconut brown sugar topping. Too bad I didn’t come to this conclusion many years ago; it would have saved Mom a great deal of work…

Given the sweet broiled topping, I could reduce the typical amount of sugar in the cake. I helped myself to Mom’s trick, first lightly toasting the dried coconut to deepen the flavor.  Unsweetened shredded dried coconut is the norm in my kitchen today, soaked luxuriously in light coconut milk before going into the batter. Coconut oil eliminated the need for creaming and mixed up quickly with eggs, coconut flavored yogurt and a touch of rum. A combo of whole wheat pastry and almond flours provided a fluffy, delicate crumb. And the broiled topping took about five minutes. The cake was terrific, chock full of coconut flavor with a fine, delicate texture and sweet crunchy topping. The icing on the cake? The leftover slices freeze beautifully. 

Changing up treasured tradition is a hard sell for most of us. I probably shouldn’t have waited so long to try. But since I did, I’m pretty pumped that it worked out this well. Yes, there was cake. And in its own way, just as delicious as I remember. 

Coconut Cake with Broiled Brown Sugar Topping

Single layer coconut cake with fine, delicate crumb and crisp brown sugar coconut topping.
Prep Time45 minutes
Cook Time30 minutes
Total Time1 hour 15 minutes
Course: Dessert
Cuisine: American
Keyword: coconut
Servings: 10

Ingredients

  • 1/2 cup unsweetened shredded coconut
  • 1/2 cup light coconut milk
  • 1 cup whole wheat pastry flour
  • 1/2 cup fine almond flour
  • 1 1/2 tsp baking powder
  • 1/2 tsp salt
  • 2 large eggs
  • 1/3 cup sugar
  • 1/3 cup coconut oil
  • 1/3 cup coconut flavored yogurt
  • 1/2 tsp vanilla extract
  • 1/2 tsp coconut extract
  • 1 tbsp rum

Topping

  • 2 1/2 tbsp butter, melted
  • 1/3 cup brown sugar, packed
  • 2 tbsp cream I used plant based creamer
  • 1/2 cup unsweetened shredded coconut
  • 1/4 cup chopped pecans

Instructions

Cake

  • Preheat the oven to 350 degrees F. Spray a 9-inch round pan with cooking spray and line the bottom with a parchment paper circle. 
    Place the coconut in a small skillet over medium heat and toast to a light golden brown, stirring frequently. Pout the coconut into a small bowl and mix in the coconut milk. Set aside to soak while prepping the remaining ingredients. 
    In a medium bowl, stir together the flours, baking powder and salt. 
    In a large mixing bowl, beat the eggs, sugar and oil until well combined and frothy. Stir in the yogurt, extracts and rum. Alternately stir in the soaked coconut mixture with the dry ingredients until no streaks remain, but don’t over mix. 
    Pour the batter into the prepared pan and bake for 25-30 minutes, until a toothpick inserted in the center comes out clean. Cool the cake in the pan until ready for the topping. 

Topping

  • Stir the topping ingredients together and spread evenly over the top of the cake, all the way to the pan edges. Broil approximately three inches from the heat til bubbly and brown, approximately three to five minutes. 

Notes

  • Nutrition Facts
  • Total fat: 24.7 g. 
  • Saturated fat: 14 g
  • Cholesterol: 41 mg
  • Sodium: 161 mg
  • Total Carbohydrate: 26 g
  • Fiber 3.7 g
  • Sugar: 13.5 g
  • Protein: 6.1 g

Sautéed Apple Slices

Sautéed Apple Slices

You can take the girl off the farm, but you can’t take the farm out of the girl… 

Pumpkin spice has made a valiant effort to convince folks that it is the harbinger of autumn. But the farm girl in me knows better, because autumn is all about the apples. I thoroughly enjoyed a recent trip back to the old southwestern Ohio hometown, including a stop at Fulton Farms, a local farm and market operation. The produce specialties through the summer here are luscious strawberries and right-off-the-stalk sweet corn, but it’s September now and it’s all about the apples.  

Apples have played a significant role in farm communities through many generations. I would wager that on the farm, we ate more apples than any other fruit because they “keep” for some time in their fresh form, and can be preserved in so many additional forms. Mom’s freezer applesauce was a staple in our meals throughout the winter. Apples can be canned or dried for longer storage and rehydrated for compotes, smoothies and baking.  They can also be pressed into delicious fresh cider. One just might let the cider “turn” a bit for a tangy hit of hard cider. One of the ways that midwestern farm kids get early access to the booze! Maybe this was the start of my penchant for adding a touch of liquor to my recipes-and yes, today’s recipe is no exception…

Many varieties were on display that day at the farm market, so many that it was tough to make a choice. But choose I did, and munching on them for breakfast brought to mind my recipe for sautéed apple slices. This is one of my quick and easy desserts, making an appearance without the need for planning and/or shopping in advance. I usually have a few apples in my hydrator drawers, and the cooking takes just minutes. The thinly sliced apples are sautéed in butter and brown sugar for sweet richness, then spiced with cinnamon, cardamom, and nutmeg. A touch of bourbon deepens the flavor and a small hit of white miso tempers the sweetness. I find it reminiscent of apple pie without the pastry. My taste buds might whine a bit about that, but my waistline is appreciative. Should my need for pastry be desperate, I can always tuck in several of my mini almond shortbread. More typically, we top the apple saute with a dollop of plain yogurt sweetened with honey. 

You needn’t have been raised on a Midwestern farm to enjoy the delicious diversity of apples. No matter your locale, you can bypass the pumpkin spice drive through and  head home with a couple of apples for a quick dessert of sautéed apple slices.  

Sautéed Apple Slices

Buttery saute of apples with brown sugar, currants and autumn spices.
Prep Time15 minutes
Cook Time15 minutes
Total Time30 minutes
Course: Dessert
Cuisine: American
Keyword: apples, cinnamon
Servings: 4

Ingredients

  • 2 large apples I use Fuji
  • 1 tbsp butter
  • 1 tbsp brown sugar
  • 3/4 tsp ground cinnamon
  • 1/8 tsp ground cardamom
  • 1/8 tsp nutmeg
  • 1 tbsp bourbon can substitute apple juice
  • 1 tsp white miso
  • 3 tbsp currants can substitute raisins
  • 1/2 tsp vanilla extract
  • 1/4 cup chopped walnuts

Instructions

  • Peel, core and thinly slice the apples. In a medium skillet, melt the butter over medium heat. Stir in the brown sugar and spices. Add the apple slices and stir to coat. Stir in the bourbon, miso and currants. Reduce heat to simmer, cover skillet and cook for 10-15 minutes, or until apples are tender. If there is more juice than desired, turn up the heat to reduce. Stir in the vanilla and walnuts, remove from the heat and serve.

Notes

  • Nutrition Facts
  • Calories: 159
  • Total Fat: 7.8 g
  • Saturated Fat: 2.1 g
  • Cholesterol: 8 mg
  • Sodium: 75 mg
  • Total Carbohydrate: 20.7g
  • Fiber: 3.8 g
  • Total sugars: 15.3 g
  • Protein: 2.5 g